How to Make PWA/TWA App For Any Website

Nowadays making a web view app is the fastest way to convert a web into an Android Mobile Application. But we view application contains a lot of deficiency to run the website’s functions as a Mobile Application.

For Example-

  • Push Notifications
  • Web Bluetooth
  • Web USB
  • Many others

But We have another best option to deploy a Website into Mobile Application which is TWA/PWA – Trusted Web Activity. So in this article, we are going to teach you how you can easily Build a TWA / PWA application for all types of websites and Foodomaa – Multi-restaurant Food Ordering, Restaurant Management, and Delivery Application.

Step 1: Set up a TWA

Setting up a TWA doesn’t require you to write any Java code, but you will need to have Android Studio.

Create a new TWA project in Android Studio

    • Open Android Studio and click on Start a new Android Studio project.
    • Choose Add No Activity
    • Configure your project:
      • Name: name of your application
      • Package Name: an identifier for Android Applications on the Play Store must be unique, I suggest using the URL of your PWA in reverse order (eg. com.codeyon.com)
      • Save location: where your project will exist on your machine
      • Language: you will not write any Java code (leave a default Java)
    • Minimum API Level: API 19 (required by the support library)
    • do not select any checkboxes (no Instant Apps nor AndroidX)

Add TWA Support Library

To add a library required to use TWA we need to modify two files. Both of them live in the same folder Gradle Scripts, both have the same name build.gradle, we can distinguish which one is which by looking at the description in the parenthesis.
  • Add Jitpack configuration – build.gradle (Project: Codeyon) – this is the Project level build.gradle. This allows us to add a dependency in the second file.

allprojects {
  repositories {
    ...
    maven { url 'https://jitpack.io' }
    ...
  }
}
Js
  • Add required dependency – this is the Module level build.gradle

// build.gradle (Module: app)

dependencies {
  ...
  implementation 'com.github.GoogleChrome:custom-tabs-client:a0f7418972'
  ...
}
Js

  • Enable Java 8 – TWA library uses Java 8 features we also need to enable Java 8. To do that we need to add compileOptions as below:

// build.gradle (Module: app)

android {
  ...
  compileOptions {
    sourceCompatibility JavaVersion.VERSION_1_8
    targetCompatibility JavaVersion.VERSION_1_8
  }
  ...
}
Js

  • Add manifestPlaceholders – variables that will be used in the next step when configuring our TWA

// build.gradle (Module: app)

android {
  ...
  defaultConfig {
    ...
    manifestPlaceholders = [
      hostName: "yourdomain.com",
      defaultUrl: "https://yourdomain.com",
      launcherName: "Your app name"
    ]
    ...
  }
  ...
}
Js

Add TWA Activity

When required dependency and variables are there, we can continue and set our TWA up. We do that by editing Android App Manifest.

When creating a project we selected Add No Activity option, because of that our manifest is empty and contains only the application tag.


<!-- manifests/AndroidManifest.xml -->

<manifest
    xmlns:android="http://schemas.android.com/apk/res/android"
    package="yourpack.name.here">
    <application
        android:allowBackup="true"
        android:icon="@mipmap/ic_launcher"
        android:label="${launcherName}"
        android:supportsRtl="true"
        android:theme="@style/AppTheme">

        <activity
            android:name="android.support.customtabs.trusted.LauncherActivity"
            android:label="${launcherName}">

            <meta-data
                android:name="android.support.customtabs.trusted.DEFAULT_URL"
                android:value="${defaultUrl}"/>

            
            <intent-filter>
                <action android:name="android.intent.action.MAIN" />
                <category android:name="android.intent.category.LAUNCHER" />
            </intent-filter>

            
            <intent-filter android:autoVerify="true">
                <action android:name="android.intent.action.VIEW"/>
                <category android:name="android.intent.category.DEFAULT"/>
                <category android:name="android.intent.category.BROWSABLE"/>
                <data
                    android:scheme="https"
                    android:host="${hostName}"/>
            </intent-filter>
        </activity>
    </application>
</manifest>
XML
First we replace existing package name with our application ID and label with value from our manifestPlaceholders
Then we add TWA activity by adding an activity tag inside the application tag.

Step 2: Verify relationship between the website and the app

TWA requires a connection between the Android application and our PWA. To do that we use Digital Asset Links.
The connection must be set on both ends, TWA (application) and PWA (website).

Establish application to website relationship

To establish that connection we need to modify our  manifestPlaceholders where our variables live. We need to add an extra element called assetStatements that keeps the information about our PWA.

// build.gradle (Module: app)

android {
  ...
  defaultConfig {
    ...
    manifestPlaceholders = [
      ...
      assetStatements: '[{ "relation": ["delegate_permission/common.handle_all_urls"], ' +
        '"target": {"namespace": "web", "site": "https://yourdomain.com"}}]'
      ...
    ]
    ...
  }
  ...
}
Js
Now we need to add a new meta-data tag to our application tag. This will inform the Android Application that we want to establish the connection with the application specified in the manifestPlaceholders.

<!-- manifests/AndroidManifest.xml -->

<manifest
    xmlns:android="http://schemas.android.com/apk/res/android"
    package="${packageId}">

    <application>
      ...
        <meta-data
          android:name="asset_statements"
          android:value="${assetStatements}" />
      ...
    </application>
</manifest>
XML
That’s it, we just established the application to website relationship, now let’s jump into the website to application direction.

Establish website to application relationship

To establish the connection in the opposite direction we need to create a *.json file that will be available in our app’s /.well-known/assetlinks.json path.
The file can be generated using generator build into Android Studio. We need three values to generate the file:
  • hosting site domain – our PWA url (eg. https://yourdomain.com/)
  • app package name – our TWA package name (eg. yourpack.name.here)
  • app package fingerprint (SHA256) – unique SHA256 that is generated based on Google Play Store keystore
We already have first and second values. Below I will describe how we can get the last one using Android Studio.
First we need to generate signed APK:
  • In the Android Studio go to: Build → Generate Signed Bundle or APK → APK
  • Use existing keystore (if you already have one) or Create new…
  • Fill the form (remember the credentials as those are the credentials that the application will be signed with, they confirm your ownership of the application)
This will create a keystore file that is required to generate the app package fingerprint (SHA256)
  • Select type of bundle (release as we want a production bundle) and signature versions
This will generate our APK that will be used later to create a release in Google Play Store.

After creating our keystore we can use it to generate required app package fingerprint (SHA256). This file is extremely important as it works as a proof that you are the owner of the application. 

If this file is lost, you will not be able to do any further updates to your application in the store.
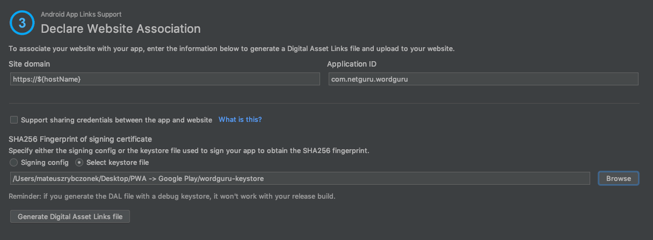
Going back to Android Studio, we need to go to Tools → App Links Assistant, it will open a sidebar that shows steps required to create a relationship between application and website.
Go to Step 3 – Associate website, then we need to fill required data (Site domain and Application ID) and select the keystore file generated in the previous step.
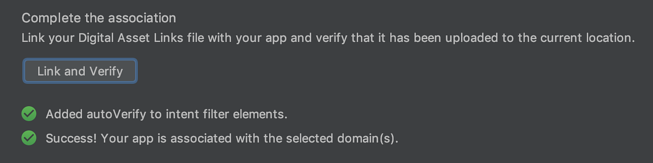
After filling the form, press Generate Digital Asset Links file. This will generate our assetlinks.json file, the file should look similar to the code below.

[{
  "relation": ["delegate_permission/common.handle_all_urls"],
  "target": {
    "namespace": "android_app",
    "package_name": "yourpack.name.here",
    "sha256_cert_fingerprints": ["8A:F4:....:29:28"]
  }
}]
Js
This is the file we need to make available in our app’s /.well-known/assetlinks.json path. I will not describe how to make it available on that path as it is too project specific.
After doing that we can test the relationship by clicking on the Link and Verify button. If all goes well we get a confirmation with Success!
Yay! we just established a two-way relationship between our Android application and our PWA.
Note: You can find the code in this repo.

Step 3: Get the required assets

We will need a few more assets before we can proceed to Google Play Store:
  • Icons with following dimensions: (48 x 48, 72 x 72, 96 x 96, 144 x 144, 192 x 192) or adaptive icon
  • Google Play Store logo – image – 512 x 512 32-bit PNG (with alpha)
  • Google Play Store banner – image – 1024 x 500 JPG or 24-bit PNG (no alpha)
  • Few screenshots from the application for phone and tablet
Having all those we can proceed to the Google Play Store developers console and publish the application.

Step 4: Publish to Google Play Store

Let’s go to the last step and finally push our app to the store.

Using the APK generated before (you can find it in your AndroidStudioProjects folder (eg. AndroidStudioProjects/Wordguru/app/release/app-release.apk) we need to go to the Google Play console where we can publish our application. I will not describe the process of publishing an application in the store as the wizard makes it pretty straight forward and we are guided step by step during the process.

After the release it may take a few hours for the application to be reviewed and approved, only then it will finally appear in the store’s applications list.

TIP: If you can’t find it you can create a new APK by going to Build → Generate signed bundle / APK → Build APK, passing our existing keystore file, and filling the alias and password that we used when we generated the keystore. After the APK is generated a notice should appear and you can get to the file by clicking on the location link.

Summary

That’s it! We just pushed our PWA to the Google Play Store. The process is not as intuitive as we would like it to be, but still, with a bit of effort it is doable, and believe me, it gives that great feeling at the end when you see your app being available at Google Play Store.

It is worth pointing out that this feature is in the very early phase and I would consider it experimental for some time. I would not recommend going with the production release of your application for now. It works only for users with Chrome 72 and above (everything below will be able to install the app, but the app itself will crash instantly, not the best user experience I guess). Also, the official release of custom-tabs-client does not support TWA yet (that is why we used raw Github link instead of official library release).

Comments are closed.